
The traditional design cycle of new product development has relied on the development and testing of physical prototypes. The ability to identify aesthetically pleasing designs, or validate different designs through physical testing, allows designers and engineers to collect data that may be difficult or impossible to generate through alternative virtual validation methods, such as structural analysis (FEA). When the material selected for the application is identified as plastic, it is important to consider how the production part will be manufactured to ensure the performance of the prototype part is representative of the final production part. For parts that will be manufactured using the injection-molding process that means that a prototype mold must also be constructed. With compressed design timelines and limited budgets, the details of the prototype mold and their implications on part performance, can often be overlooked. This article will highlight a few aspects of the prototype mold that needs to be considered to help ensure the measured performance of the prototype part will be representative of the final design.
 Gate Type and Location
One of the first decisions with any injection-molded part is identifying where the gate will be located. The gate is the feature in which the molten plastic enters the part cavity. It is often removed after manufacturing, and therefore, considered inconsequential on the part performance. However, the gate location influences the pressure required to fill the mold, the molecular and fiber orientation in the part, the location of weld lines, and the presence of sink marks or flow lines. Therefore, the decision of gate location in a prototype mold will influence the prototype part’s performance. The gate location and type can also dictate decisions regarding minimum nominal wall thickness of the part, maximum rib dimensions, and part dimensional stability.
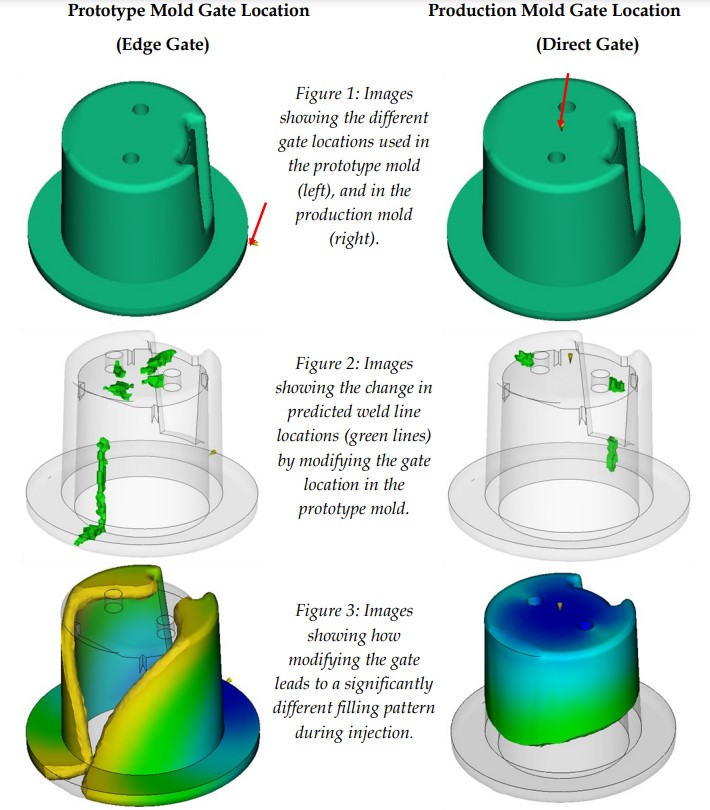
A common use of prototype tooling, is to evaluate the feasibility of a part design that will be manufactured in a multi-cavity, hot-runner mold. Due to budget and timing constraints, the prototype mold is often “simplified” to a single-cavity that uses a cold runner, instead of a hot runner. Additionally, because the feed system design has been changed, the gate location and type will also typically change. Figure 1 shows such a part, where the production parts were to be manufactured in a multi-cavity mold, with a hot, direct gate on the top surface. However, the prototype parts were manufactured in a mold that used an edge gate at the bottom flange of the part. Changing the gate location to the bottom flange, altered how the plastic would fill in the mold, and shifted the weld line locations to different areas of the part, Figure 2. Additionally, using an edge gate changed the filling pattern in the mold (Figure 3), and influenced the dimensional stability of the part. A better option for the mold construction would have been to place the gate in the same location and use a single hot drop to fill the part. While not identical to the production tool, it would have allowed for a more representative picture of the process required to manufacture the part, and a more representative prototype part to use for validation testing.
Mold Construction and Cooling Line Layout
Another aspect of prototype molds that is often overlooked is the cooling efficiency of the mold. An injection mold is essentially a heat exchanger. The cooling efficiency is dependent on the mold materials selected to manufacture the prototype mold, and the proposed cooling line layout. The combination of which mold materials to use and the cooling line placement influences not only how fast the part can be manufactured, but also influences the shrinkage rate of the material, the degree of crystallization in semicrystalline materials, and surface appearance of the part.
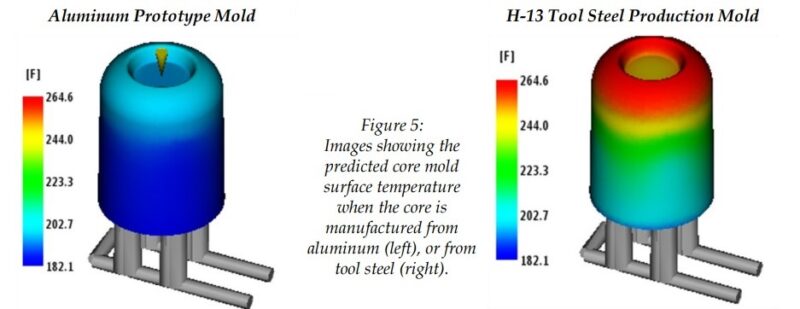
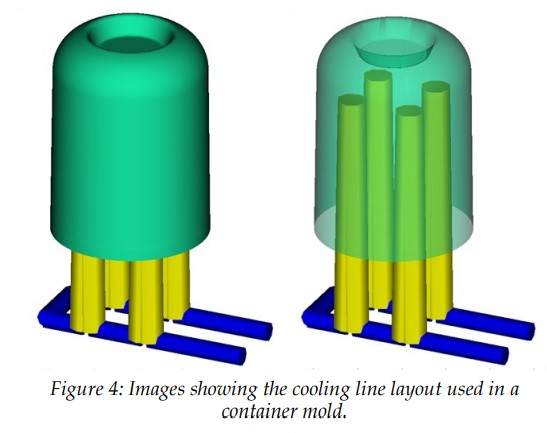 Due to cost and lead time constraints, aluminum has been a desirable metal to select when manufacturing prototype molds. The high thermal conductivity of aluminum compared to tool steels, combined with the ability to quickly machine the cavities makes it desirable to acquire prototype parts quickly. However, using aluminum for the prototype tool, when tool steels will be used for production molds can lead to misleading results, such as the ability to maintain a uniform mold surface temperature. Since aluminum has a significantly higher thermal conductivity than traditional tool steels using the same cooling line layout in an aluminum tool, will lead to a more uniform mold surface temperature. Figure 4 shows a container mold that used that same core cooling line layout in an aluminum prototype mold, as in a tool steel production mold. The images highlight that the aluminum mold was capable of maintaining a more uniform and cooler mold surface temperature than the production tool, Figure 5. After constructing both molds, it was determined that the lower mold temperature allowed the part to be more dimensionally stable and manufactured faster than in the production mold.
 The ability to manufacture and test physical prototypes of new plastic components can be an invaluable tool in collecting data during the product development process. However, a holistic approach must be taken to ensure an accurate representation of the expected part performance. Particularly, how the prototype is manufactured must be considered. Paying attention to the design and construction of the prototype tool and ensuring representative conditions are used to manufacture the prototype, will help provide engineers and designers with valuable information that will allow them to bring their product to market faster.
